Metal powder characterisation: standards and test methods for consistent quality in AM
While Additive Manufacturing uses some powder characterisation methods similar to those used in conventional metal powder technologies, it is necessary to define additional properties critical for repeatable, reliable AM. ASTM International's Dr Alexander Liu, Head of Additive Manufacturing Programs – Asia Region, Singapore, and Dr Rafi Khalid, Sr Lead, Additive Manufacturing Programs Development, Singapore, outline the key metal powder characteristics for AM and their significance, as well as discuss the industrial test methods and standards AM part makers rely on to maintain consistent quality. [First published in Metal AM Vol. 8 No. 1, Spring 2022 | 10 minute read | View on Issuu | Download PDF]
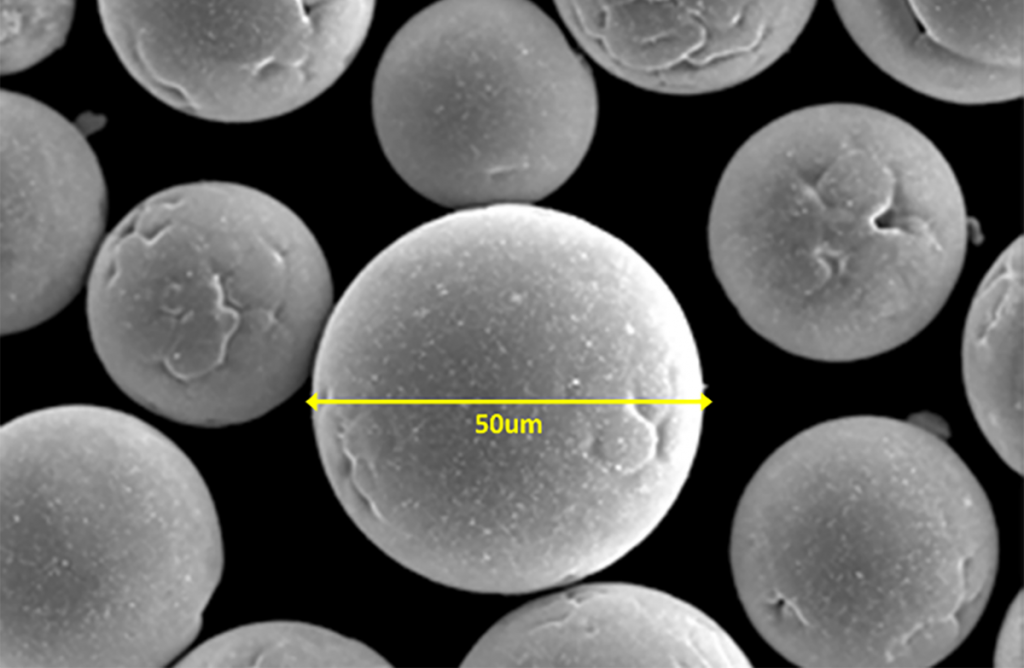
Powder is the most common feedstock for metal Additive Manufacturing, but, even before AM, metal powders were widely used for processes, such as ‘press and sinter’ Powder Metallurgy (PM), Metal Injection Moulding (MIM), and Hot Isostatic Pressing (HIP), as well as a range of uses which do not fall under the umbrella of PM. The Powder Metallurgy industries commonly characterise metal powders by their chemical, physical, and rheological (i.e., flow) properties. These powder characteristics have a strong effect on the quality and performance of the parts produced. Regardless of the application, industries need relevant and up-to-date powder characterisation methods and standards to maintain a consistent quality of manufacturing.
AM uses methods to characterise powder that are similar to traditional metal manufacturing techniques. However, due to the nature of AM processes, additional properties need to be defined. Important factors are the flow, shape, morphology, particle size distribution (PSD), chemistry, and packing density of the powder. These properties are critical for consistent, repeatable, and reliable AM. Powders behave differently, depending on the environment and process parameters they are exposed to.
For instance, the minimum layer thickness for Powder Bed Fusion (PBF) is a function of the powder particle size. To additively manufacture a layer of 20 µm versus 100 µm in thickness, the powder particle size can be different. This is why it is essential to define the requirements for powder properties in the form of powder specifications. For metal AM processes, powder quality will always be one of the most critical factors to ensure good part production.
The process used to manufacture the metal powders directly influences the powder characteristics. The majority of AM powders are produced by gas atomisation and plasma atomisation. The powder properties depend on the atomisation conditions, powder handling, storage, and shipping. Tight controls and traceability are required to ensure quality standards are met. These additional measures can lead to additional costs.
While transporting powder from the production facility to the customer or manufacturing location, ambient temperature and humidity can affect the characteristics of the powder, so it must remain dry and free from contamination during transportation and storage. This is why the AM industry needs a way to ensure the quality of powder is maintained throughout the supply chain. It is good practice to test the powder at the production and manufacturing facility.
Different metal powder characteristics and their significance in the AM process
Table 1 describes the key characteristics that should be assessed before metal powder is used for PBF or Directed Energy Deposition (DED). Each characteristic can influence the process and impacts the final properties of the part.
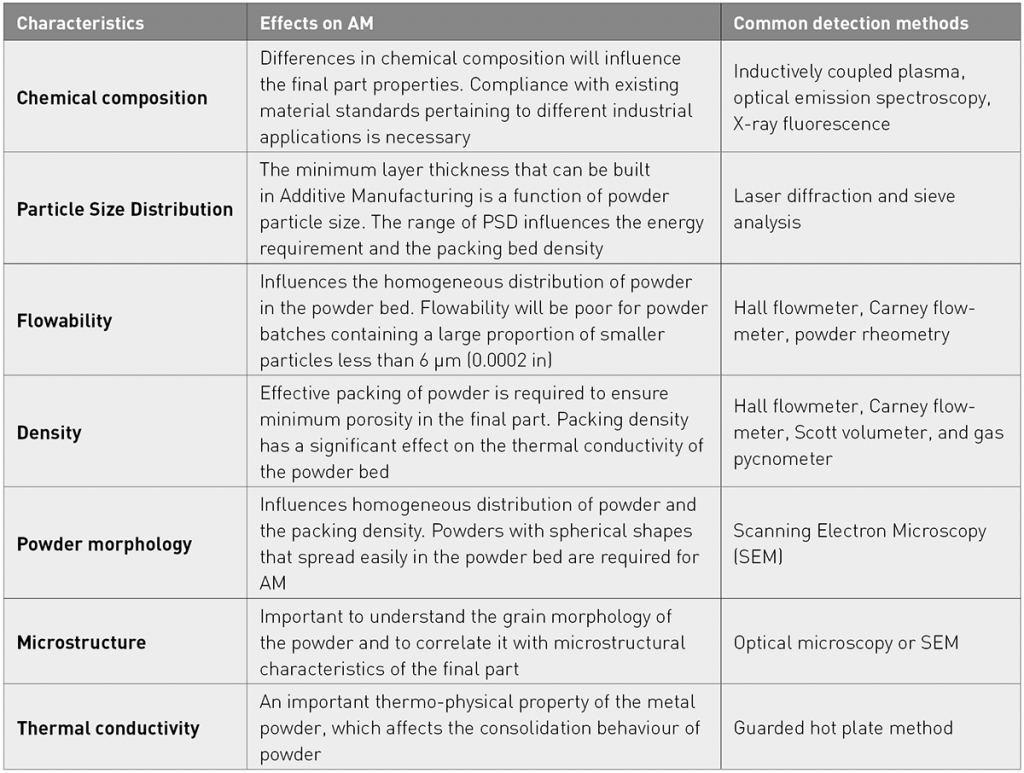
Powder characteristics are interdependent with other properties. For example, flowability is dependent on a combination of properties; spherical shaped and large particles tend to improve flow. They are characterised by powder morphology and PSD respectively. Before performing powder characterisation, it is best practice to:
- Ensure the powder sample is obtained from a properly stored condition, including maintaining required humidity levels and free of contamination
- Follow a powder sampling practice such as ASTM B215-10, practice B
- Document the details such as supplier information, date of first opening the container, and batch/lot number
- Identify the applications and the compliance requirements (such as ASTM F1472 / ISO 5832-3 for surgical implants)
Standards applicable for powders
Standards development organisations are working to publish test methods for powder characterisation. Standards are essential to ensure quality and consistency of powders. ASTM International and ISO have both published several standards that can be used to characterise the properties described in Table 1. These tests are usually done by the powder producer using in-house and/or outsourced equipment. In most cases, testing requires a combination of both to report the characteristics of the powder.
To provide quality assurance to customers, a certificate of compliance is commonly provided with the delivery of the powder. Often, users rely on these test results to match their powder specifications. The specifications of the powder depend on the qualification and application requirements of the user, including feedstock purchase and use specifications. The purchase specification describes the required properties of the powder, while the feedstock use specifications define the acceptance criteria of the powder properties intended for use within the selected AM process. To enhance quality assurance and meet regulatory requirements, users may also perform tests on the powders.
Consistent powder characteristics are crucial to ensure repeatable manufacturing of metal AM parts. One of the key challenges in powder testing is maintaining consistency in the test results across different facilities. Despite well-defined methodologies for testing metal powder, the results will usually not be the same when tested by different organisations – or even technicians within the same organisation. This happens in practice even when the same test method standard is being used for the same batch of powder.
Variations in test results occur primarily because of the conditions in the test lab. In the test lab, the powder is exposed to many variables that can skew the results. This could include environmental conditions, improper material handling practices, untrained operators, and a lack of documented procedures. This is why it is in the end users’ interest that the powder has been tested by a qualified lab. These types of labs have demonstrated testing capabilities according to the applicable standards published by ASTM International and/or ISO.
One approach to ensure the reliability of the powder characterisation results is to generate data describing the performance of the powder testing facility. The ASTM Additive Manufacturing Powder Metallurgy Proficiency Testing Program (AMPM PTP) is designed to address this. It is used as a statistical quality control tool to enable participating laboratories to assess their performance when testing powder. AMPM PTP is supported by long-standing relationships with ASTM International committees B09 on metal powders and metal powder products and F42 on AM. The programme helps monitor a lab’s strengths and weaknesses and, furthermore, helps improve and maintain a high level of performance using test methods from ASTM to compare labs. This programme also helps labs meet accreditation requirements.
AMPM PTP is into its fourth year and has over fifty-three participating labs from more than fourteen countries. The programme conducts cycles in April and October each year using different alloys, including titanium, nickel, steel and aluminium. Each participating lab receives a comprehensive report on the statistics of test results to understand the characteristics of powders. This report can be used to satisfy accreditation requirements and demonstrate a lab’s capabilities for industries beyond AM.
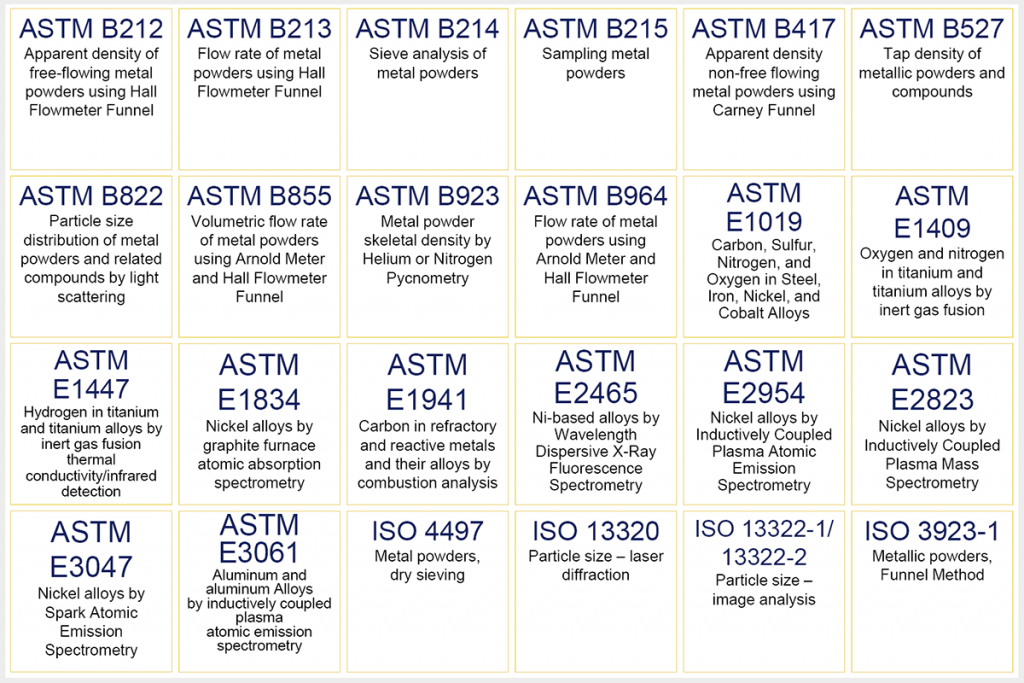
It is necessary to understand both the fundamentals of a powder’s behaviour and the AM process in order to describe the relevant test methods and identify gaps in standards. AMPM PTP also benefits standards development committees by continuously improving and revising existing standards. The programme also facilitates new specifications and methods for metal powders specifically for AM. Fig. 2 shows the standards used in the AMPM PTP.
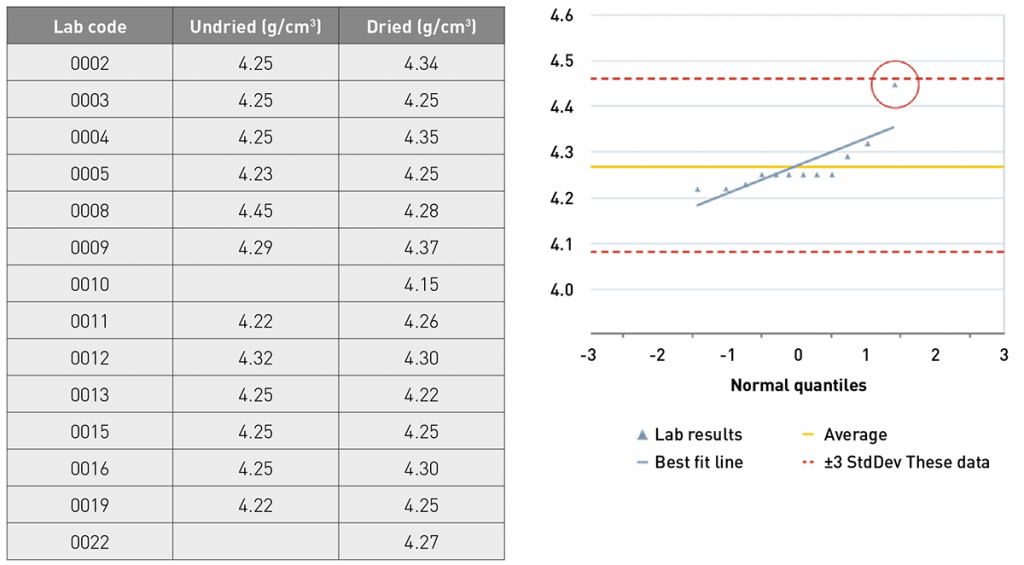
Participants stand to improve and maintain a high level of performance using ASTM test methods when compared with other labs from around the world. The ASTM B212 Apparent Density Using Hall Flowmeter Funnel standard is used as an example of how a participant can benefit from AMPM PTP (Fig 3). The ASTM D7915-14 standard method was used for identifying outliers. As shown, the average and standard deviation are plotted based on the results provided by participants. One result was near the upper limit while still within the acceptance criteria. Even though the results were within the acceptable three standard deviations range, this lab should improve its testing capability for ASTM B212.
Additional standard test methods specific to AM, such as powder spreadability, are under development as of the end of February 2022. These new standards will be inducted into AMPM PTP when they are published. Manufacturing companies, equipment vendors, university research labs and government agencies are encouraged to participate in this programme to improve their proficiency in metal powder characterisation.
Conclusion
Defining a specific set of requirements for powder properties is the first step in ensuring quality powder for AM. It is important to adopt industry-relevant and current powder characterisation methods and standards to determine these properties. Having the powders tested by a qualified and certified laboratory is equally important to ensure the data is reliable. For AM, powder quality remains the basis for process repeatability and reliability and the production of quality parts.
Authors
Dr Alexander Liu and Dr Rafi Khalid
ASTM International Additive Manufacturing Center of Excellence, Singapore


