Euro PM2020 technical review: Advances in process control for metal Binder Jetting (BJT)
Within the programme of the well-received Euro PM2020 Virtual Congress, held October 5–7, 2020, and organised by the European Powder Metallurgy Association (EPMA), a technical session was held on process control in metal Binder Jetting. In this article, Dr David Whittaker provides a summary of two of the papers presented, which look at applying the Master Sintering Curve for 316L parts, and process parameter optimisation for 17-4 PH parts. [First published in Metal AM Vol. 7 No. 1, Spring 2021 | 20 minute read | View on Issuu | Download PDF]
The Master Sintering Curve and its application on 316L steel produced by Binder Jetting
This paper was presented by Markus Schneider, Philipp Gabriel, Simon Hoeges and Christopher Schaak (GKN Sinter Metals Engineering GmbH, Germany) and addressed the benefits of using the Master Sintering Curve (MSC) approach in optimising the sintering of 316L stainless steel in Binder Jetting [1]. The main hurdles in BJT are the achievement of the required final sintered density ρs and a proper control over the sintering process. The Master Sintering Curve approach is a helpful tool to understand the sintering kinetics and to predict the resulting final sintered density ρs from simple dilatometry experiments. In the reported study, different industrial sintering profiles T(t) were numerically integrated to obtain the MSC.
The MSC approach assumes a sigmoidal evolution of the densification parameter Ψ as a function of the logarithmic sintering work ϴ(t, T), which incorporates the whole sintering profile T(t). In most cases, the sintering profile T(t) is too complex for an analytical integration, because the corresponding antiderivative cannot be found. Only for isothermal conditions, T(t)=const, can the integral be solved. However, the integral can be solved numerically by the summation of the sintering work increments if the sintering profile T(t) is partitioned into time increments of width Δt.
Several applications of the MSC approach are focused on the estimation of the apparent activation energy QMSC (an average of all contributing transport mechanisms) by minimising the perpendicular distance (error) to the average residual squares R by varying of the apparent activation energy QMSC. A simple estimation for the activation energy for self-diffusion/sintering Qs is based on the Engel-Brewer theory, in which the activation energy is related to the crystal type and the absolute melting temperature Tm.
In the study, gas (argon) atomised austenitic 316L stainless steel powder was used for all tests. Typical values of the skewed powder particle size distribution Q3(d) were in the range of d10=4.85 µm, d50=12.74 µm and d90=24.24 µm.
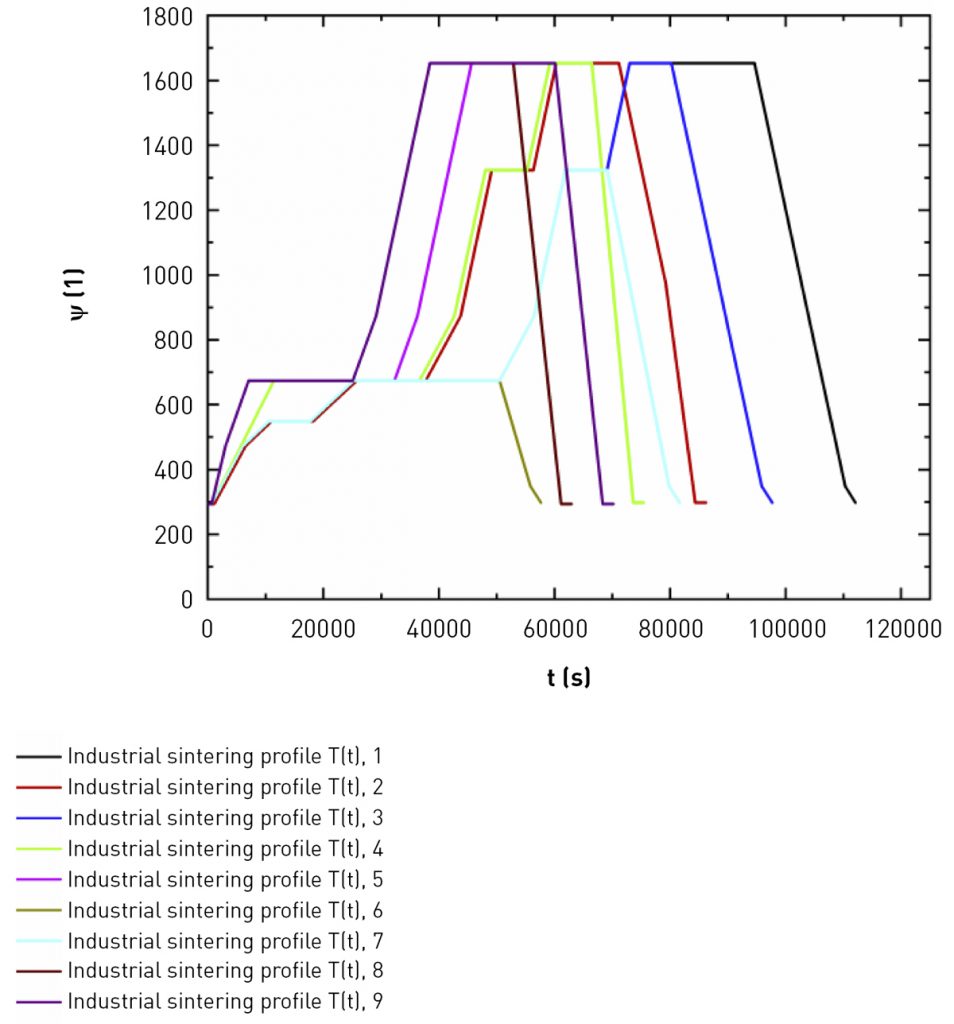
For the proof of concept of the MSC approach, nine different industrial sintering profiles with thirteen different runs/replications were followed. The recorded industrial sintering profiles T(t) are shown in Fig. 1. The local measurement of the component temperature/sintering profile T(t)comp was not possible in the batch sintering furnace. Therefore, the first boundary condition for the heat transfer (heat transfer coefficient α→∞ W/m2K) was assumed. This was not fully correct, since the heat transfer, primarily through convection and radiation from the furnace walls to the components, was neglected. As a result, the industrial sintering profile T(t) of the furnace was assumed to be identical with the component sintering profile T(t)comp (no thermal inertia of the components). Therefore, the real sintering profile of the components T(t)comp would have been shorter and without sharp dwell time plateaux, resulting in smaller sintering work ϴ(t, T) values.
The full density of 316L was assumed to be ρ0=7.93 g/cm3, to derive the densification parameters Ψ in Table 1. With its face centred cubic austenitic crystal type and its melting temperature of Tm=1673K (1400°C), the activation energy for self-diffusion/sintering Qs could be estimated with the Engel-Brewer theory as 264 kJ/mol. This estimate was quite close to the measured and published value of Qs=280 kJ/mol.
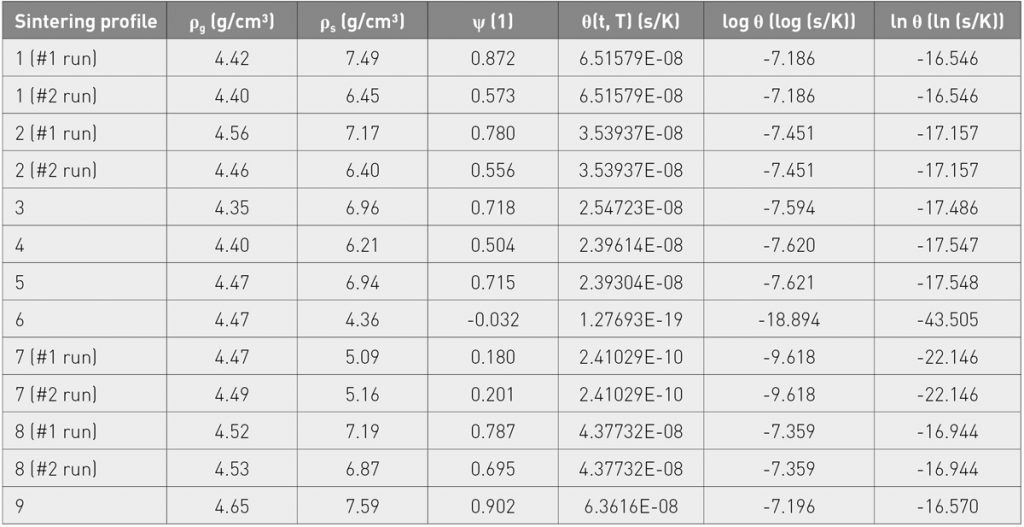
The initial green density ρg values in Table 1 were measured using the volume V and mass m of the binder jetted component, whereas the final sintered density ρs values were measured using Archimedes principle. The average value of ρg=4.47 g/cm3 was taken for the further calculations and the derivation of the densification parameters Ψ in Table 1.
Several MSCs, derived for fine MIM powders, can be found in the literature, and these results could be taken as a reference to compare the MSC based on the computed values from Table 1. The sigmoidal evolution of the densification parameter Ψ as function of the logarithmic sintering work ϴ(t, T) can be described with different functions, with a very common fitting function being an exponential type. Dilatometry results from the literature on MIM 316L (push-rod dilatometer with a 100% H2 atmosphere) are plotted in Fig. 2, together with the authors’ own results. It can be seen that the derived data points reduce to a common curve.
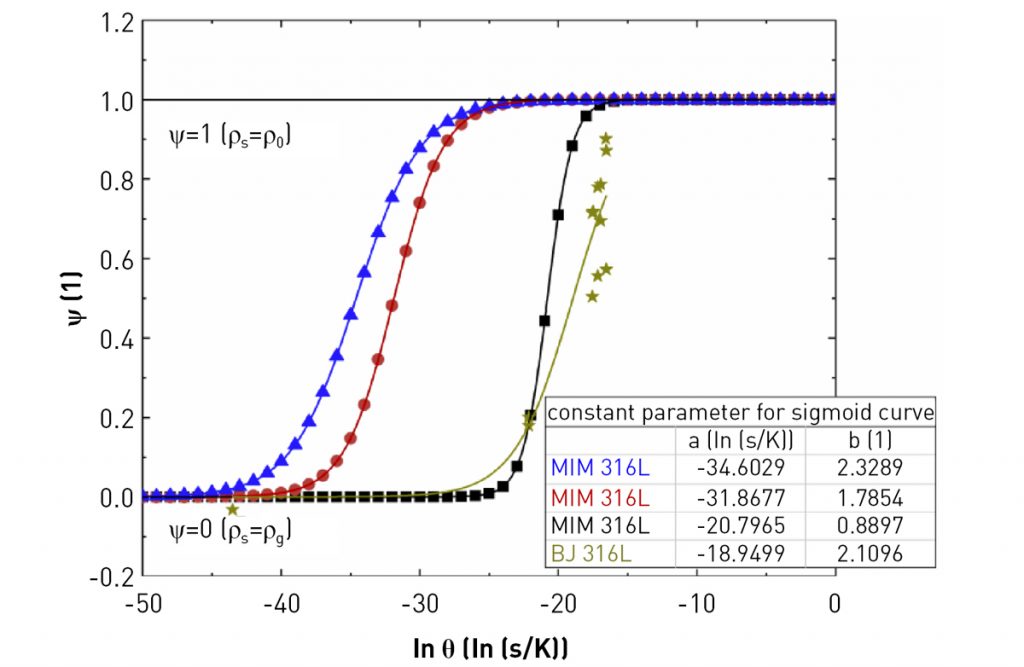
Some industrial sintering profiles T(t) were repeated (No. 1, No. 2, No. 7 and No. 8). The reproducibility was not very high, due to slightly different variations of the chemical composition between the powder lots (even within the tolerances). However, the derived data points are clustered in a narrow range. More data points are needed at very low and very high densification parameters Ψ to approximate the MSC progression more accurately. Therefore, there is uncertainty regarding the fitting function shown in Fig. 2, and the authors recommended the use of in-house, systematic laboratory dilatometer sintering runs to investigate the sintering kinetics in more detail.
Since the sintering response depends strongly on powder particle size distribution Q3(d) and chemical composition, in-house dilatometer sintering runs were needed. These runs were performed with a horizontal, single push-rod dilatometer in a 100% H2 atmosphere. Three different heating rates, ΔT/Δt, were applied (3 K/min, 6 K/min and 10 K/min). A dwell time of t=3600 s (1 h) to remove the binder at T=673 K (400°C) was introduced (debinding plateau). Beyond that plateau, the temperature T(t) had been increased to the final sintering dwell time of t=3600 s (1 h) at T=1653K (1380°C) with the same three heating rates. The cooling rate ΔT/Δt was not defined (free cooling). For the correction of the thermal expansion, a constant coefficient of thermal expansion of α=18*10-6 K-1 was assumed for the binder jetted 316L. Small cylindrical specimens were additively manufactured with a layer thickness of x=70 µm to a green height of h≈7 mm and a green diameter of d≈5 mm. Due to their small size, the dilatometer sintering profile T(t) is identical with the component sintering profile, T(t)comp. For the identification of potential build anisotropies, two different building directions were studied (Z-direction vs XY-direction).
A green density of ρg=4.218 g/cm3 was achieved for both building directions after Additive Manufacturing. The green density ρg was measured using Archimedes principle. The full density of 316L was assumed to be ρ0=7.93 g/cm3. However, the real full density ρ0 depends on the chemical composition and on the resulting microstructural phases (heat treatment history). From the dilatometer sintering runs, it was seen that densification (linear shrinkage Ɛ) occurs above T≈1273 K (≈1000°C). Densification was typical of the intermediate sintering stage II. Therefore, the dominating transport mechanism seems to be lattice (bulk or volume) diffusion. For the definition of the densification parameter Ψ, the measured linear shrinkage was converted into the corresponding final sintered density ρs, assuming isotropic shrinkage.

The highest achieved magnitudes of the linear shrinkage Ɛ and the corresponding final sintered densities ρs are given in Table 2 as a function of the dilatometer sintering profile T(t) or heating rate ΔT/Δt and as a function of the building direction. A large anisotropic shrinkage is evident from the data points in Table 2, although the reason for this anisotropy is not yet understood. A factor of two can be recognised between the two building directions and this anisotropy results in a difference between the calculated and the measured final sintered density ρs. As a result, the densification parameter Ψ exceeds its maximum value of one in Fig. 3 (Z-direction). This underlines the incorrect assumption of isotropic shrinkage; the shrinkage in the lateral direction must be smaller. Fig. 3 shows the MSCs based on the authors’ six in-house dilatometer sintering runs (using three different heating rates with two different building directions).
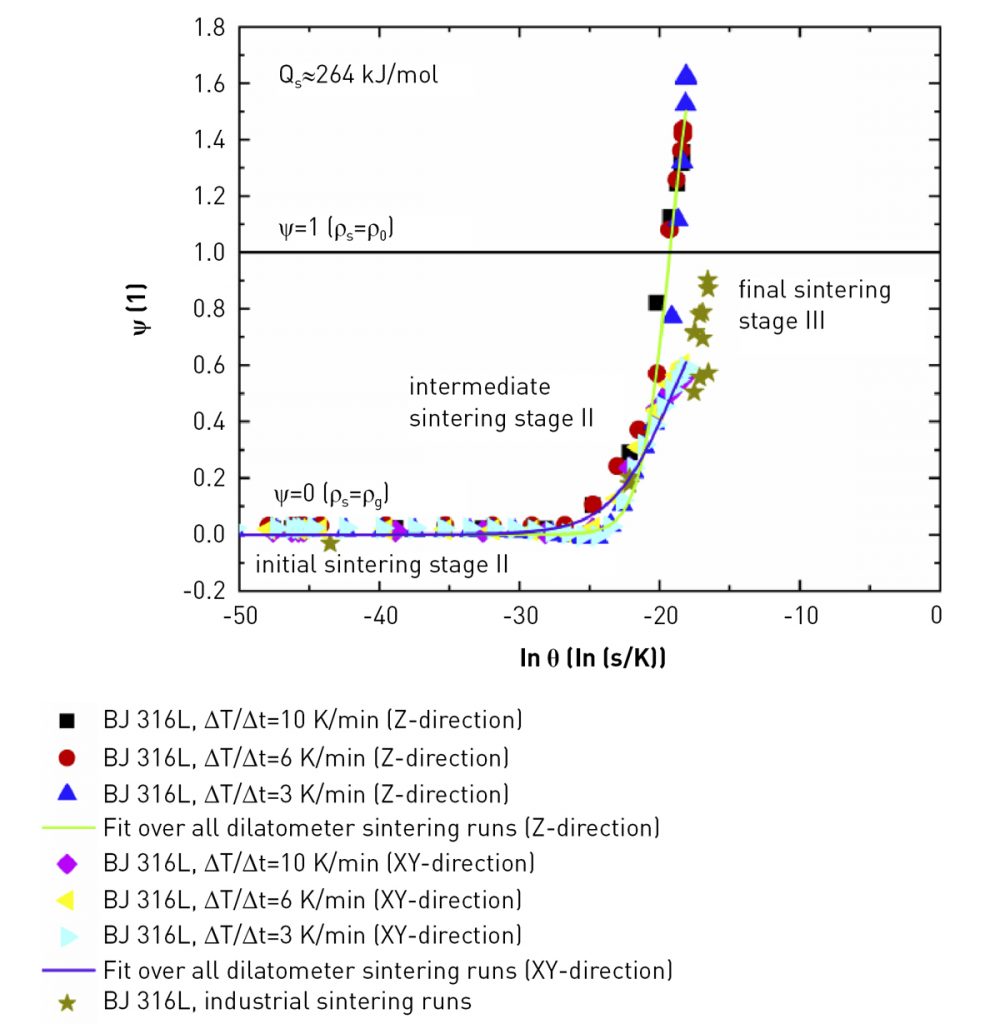
All derived sintering work ϴ(t, T) values for one building direction fall onto a common curve, independent of the applied heating rates. Due to the incorrect final sintered density ρs, the true response will be located between the two MSCs (Z-direction and XY-direction). This confirms the correctness of the MSC approach. The very good agreement between Fig. 2 (industrial sintering runs in a batch furnace) and Fig. 3 (experimental dilatometer sintering runs) is remarkable. This means that most of the densification occurs between ln ϴ=-20 ln (s/K) and ln ϴ=-15 ln (s/K). Moreover, the second plateau (asymptote, final sintering stage III) of the sigmoidal shaped MSCs is not reached. It seems that a superimposed debinding/sintering effect hinders further densification. Further research is needed to investigate if trapped gas, grain or pore coarsening or a debinding effect could explain this phenomenon.
A step towards a robust Binder Jetting technology: Process parameter optimisation for 17-4 PH steel to increase powder bed homogeneity
The final paper in the session came from Asier Lores, N Azumendi and Iñigo Agote (TECNALIA, Spain) and Unai Andres (MIM-TECH ALFA, Spain) and reported on a process optimisation exercise for binder jetted 17-4 PH stainless steel to increase powder bed homogeneity [2].
The inhomogeneity in the properties of parts manufactured by Binder Jetting is one of the main concerns for the industrial adoption of the technology. The latest trends are towards the use of finer powders in order to improve green part sinterability. As a by-product, however, the additive manufacturability of the powders becomes compromised, as flowability and powder packability deteriorate. Currently, powder deposition and spreading technologies are evolving rapidly, with new double-roller spreaders, ultra-sonic powder vibration systems and enhanced powder monitoring techniques. These new developments are focussed largely on the improvement of powder packing and the homogeneity of the AM process.
In the reported study, a single roller powder spreading system has been used, along with a pneumatic vibration-based powder deposition hopper system. With this type of system, it has been observed that parts manufactured in the same build job present some deviations in density and dimensional accuracy. Therefore, the authors tried to shed some light on the control of BJT process inhomogeneities by studying the effect of some major parameters on the dispersion of green part properties.
In this study, gas atomised 17-4PH powder, supplied by Atomising Systems Limited, was used. The powder composition and characteristics given by the manufacturer are shown in Table 3. A relatively small powder particle size (D90: 27.5 μm) was selected, due to the higher achievable packing densities, allowing higher densification after the sintering process.

The authors’ powder character-isation tests showed that most of the powder particles had a diameter between 10 μm and 20 μm and a near-spherical morphology with some satellite particles bonded to the surface. Spherical particles enhance powder packability. Powder cross-sectional examination revealed the presence of pores within a few particles, probably due to gas entrapment during atomisation. The particle size distribution showed a typical, one sized log-normal distribution, with a D50 of 17 μm.

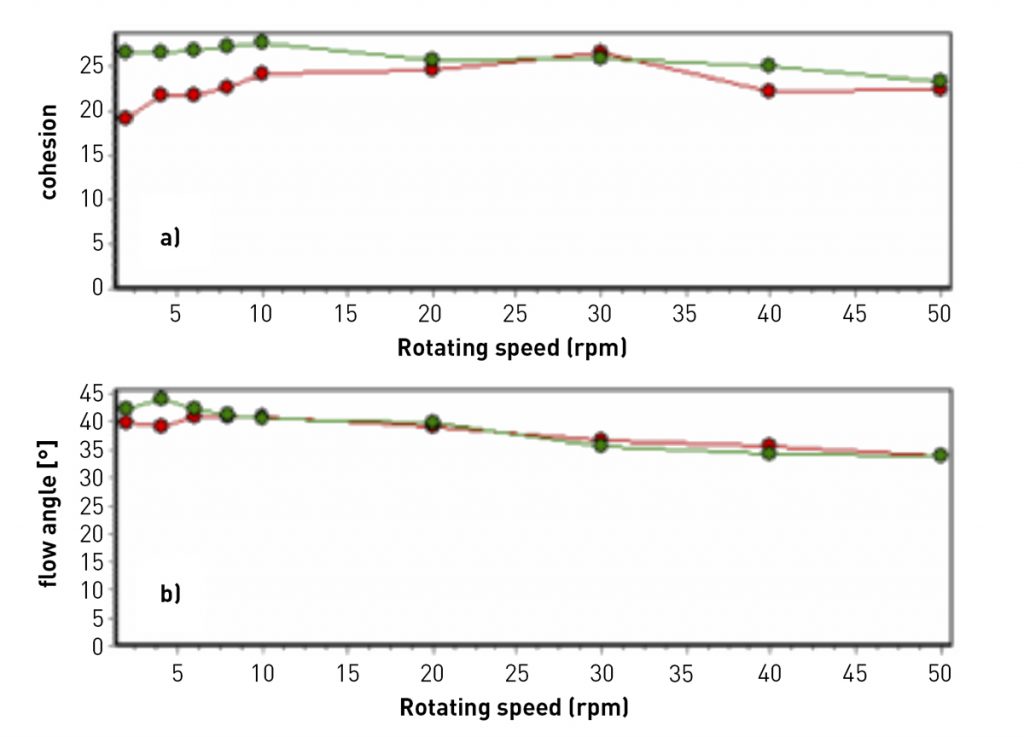
Table 4 and Fig. 4 show the results related to powder packability and flowability properties. According to the computed Hausner ratio value, the powder has a ‘passable’ flow capability, similar to other powders used for Binder Jetting purposes. The cohesive index and repose angle also rank the powder as ‘passable’. Moreover, the cohesive and repose angle response to a variation of rotation speed will keep the powder’s flow properties stable for different dynamic conditions, thus meaning that the powder behaviour may be suitable for a wider processing parameter window.
An ExOne Innovent BJT machine was used for green part build. Thirty-six small cubic samples were uniformly distributed on the printing layout in order to study the dimensional and density differences along the powder bed. The dimensions of the green parts were measured with a digital calliper and the green mass with a high precision balance. The experimental study was attempted in two different stages. In the first stage, the Binder Saturation Level (BSL) effect on the green part dimensional deviation and green density was studied. In the second stage, the effect of the deposited powder amount and part location along the Z-axis was evaluated. This second stage was performed using a L4 fractional factorial Design of Experiments (DoE) arrangement, in order to detect possible parameter effects and interactions.
Fig. 5 shows the dimensional deviations from STL nominal values as a function of the BSL. Each point represents the average of the thirty-six printed and tested samples, while the error bars correspond to the standard deviation. These results clearly show a reduction in the deviations from the STL file with the reduction of the BSL. Moreover, the reduction of the BSL also reduces the deviation of the samples from the same printing process. Despite the fact that the reduction of BSL can improve the part dimensional homogeneity, it should be noted that an excessive reduction will lead to significantly decreased green part strength and surface quality.

As could also be observed, the effect of the deviation dispersion reduction is less significant in the Y-direction, which is parallel to the print head motion and drop deposition direction. The asymmetric drop deposition, along with the different kind of powder bed alterations driven by the dynamic interaction behaviour between the droplet and the powder bed, explains the slight increase of the part dimensional dispersion in the Y-direction.
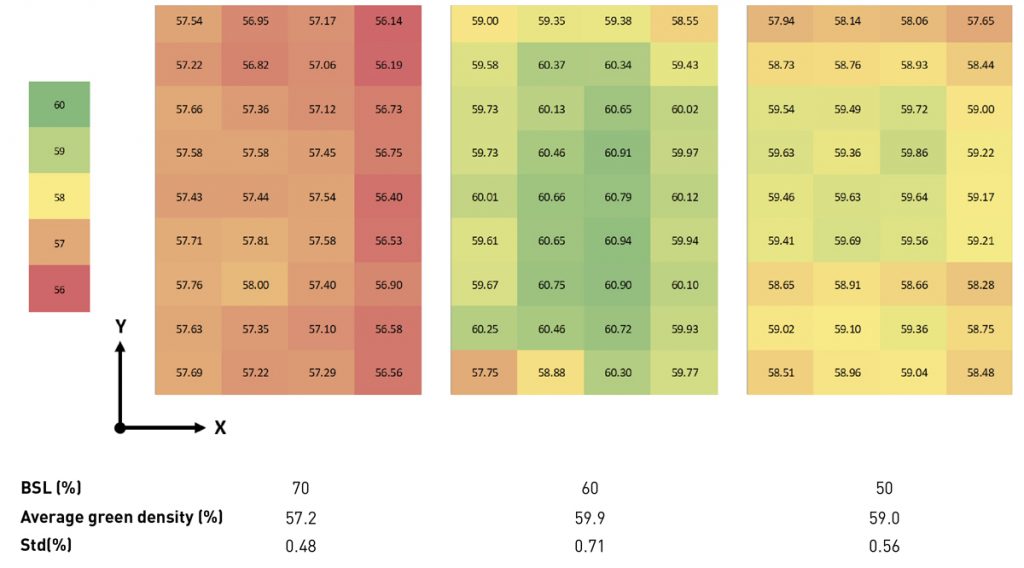
Fig. 6 shows the green density distribution of the powder bed and the mean values as a function of the BSL. As can be observed, the highest average green density achieved corresponded to the 60% saturation printing, although this printing parameter also showed the highest density deviations. The green density dispersion along the powder bed does not seem to follow a common pattern between the different printings. On the one hand, the error propagation in the geometric green density measurement could hinder the appreciation of slight patterns or differences in the powder bed. On the other hand, there are multiple process parameter interaction effects that can dramatically affect the green part density and the green part dimensions and, thus, these effects may change the green density distribution along the powder bed. The roller spreads the powder from the right to the left side of the powder bed in the X-direction. The size of the powder wave generated in front of the roller thus increases, influencing the powder packing behaviour and, therefore, the green part properties.
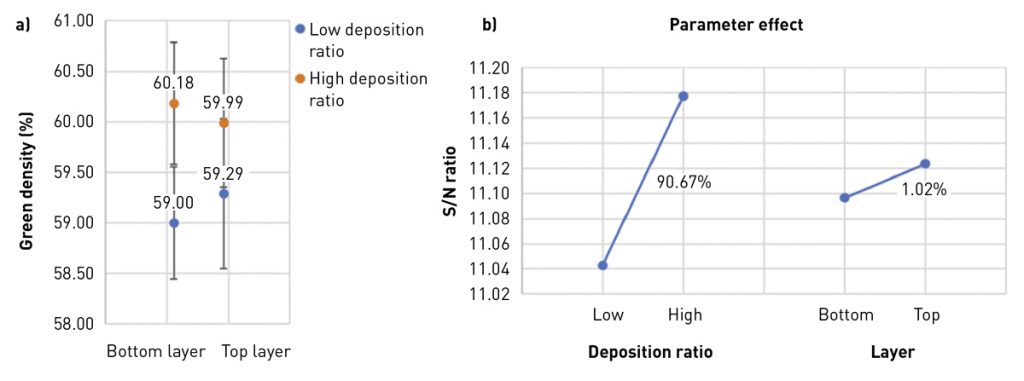
The influence of the amount of deposited material for powder layer creation and the effect of part location along the Z-axis on green part densities are shown in Fig. 7, together with the parameter effect influence obtained from ANOVA analysis. As can be observed, there is a correlation between the green density and the amount of deposited powder. According to these results, where the higher S/N ratios indicate a green density increment, the higher the amount of powder used for layer generation, the higher the obtained green density. The amount of deposited material also has a 90% effect on the green density variation, meaning it is an influencing factor. The average green density for parts binder jet additively manufactured with low powder feeding settings was 59.14% with an std of 0.66%, while, for the high powder feeding ratio, 60.06% with an std of 0.63%. No significant difference in green part density was observed as a function of part location in the Z-direction. Additionally, the measured dimensional deviations from STL values has remained essentially unchanged between the different printings. Therefore, there has not been observed any detrimental effect in the dimensional accuracy from the rise in powder feeding ratio.
Parts built with a high material deposition ratio and 50% BSL were selected for sintering, as they showed the best green properties, with reference to green density and dimensional deviations. A relative density of 98.62% was obtained, similar to MIM values, with a standard deviation of 0.58%. The obtained microstructure was composed mainly of two phases: martensite and δ- ferrite. Finally, the measured hardness was 32 ± 1 HRC, which is a typical value for as sintered 17-4 PH stainless steel.
In future work, the authors plan to study the interaction between more process parameters and their influence on powder bed inhomogeneity patterns, in order to build a precise dimensional deviation prediction model.
Author and contacts
Dr David Whittaker
Tel: +44 1902 338498
[email protected]
[1] Markus Schneider
GKN Sinter Metals Engineering GmbH, Germany, [email protected]
[2] Asier Lores
TECNALIA, Spain
[email protected]
References
[1] The master sintering curve and its application on 316L steel produced by Binder Jetting, Markus Schneider, Philipp Gabriel, Simon Hoeges and Christopher Schaak. As presented at the Euro PM2020 Virtual Congress, October 5–7, 2020, and published in the proceedings by the European Powder Metallurgy Association (EPMA)
[2] A step towards a robust Binder Jetting technology: Process parameter optimisation for 17-4PH steel to increase powder bed homogeneity, A Lores, N Azumendi, I Agote and U Andres. As presented at the Euro PM2020 Virtual Congress, October 5–7, 2020, and published in the proceedings by the European Powder Metallurgy Association (EPMA)
Euro PM2020 Proceedings
The full proceedings of the Euro PM2020 Virtual Congress are available to purchase from the European Powder Metallurgy Association.
Euro PM2021
The Euro PM2021 Virtual Congress & Exhibition will be held online from October 18–22, 2021. Planned presentations will be prerecorded and available for the duration of the event. Papers will be published as usual and the proceedings will be available for sale in October.


