A game of hide and seek with Renishaw and Altair: Artificial Intelligence-powered quality assurance on the fly
Is it possible to actively monitor the huge volumes of data from a Laser Beam Powder Bed Fusion (PBF-LB) machine to identify, through machine learning (ML), build errors as they happen? To answer this question, Renishaw and Altair played a unique game of hide and seek. In this innovative experiment, an error was deliberately hidden in a build for an artificial intelligence (AI)-based solution to find. The hope? True 'on the fly' quality assurance for Additive Manufacturing processes for accelerated product development, and dramatically reduced post-production quality checks. [First published in Metal AM Vol. 8 No. 1, Spring 2022 | 15 minute read | View on Issuu | Download PDF]
Quality management in metal Additive Manufacturing is one of the biggest challenges faced by today’s producers on their way to mass production – potentially requiring extensive process monitoring and the physical testing of every single part produced. In an effort to improve process monitoring and reduce the extent of non-destructive testing from, for example, a 100% CT scanning-based qualification processes, Renishaw and Altair set out to explore new possibilities using artificial intelligence (AI). The focus of the project was to develop a methodology to analyse the incredibly large quantities of manufacturing data generated. Putting artificial intelligence to the test, the two companies sought a novel way to simplify quality control and potentially accelerate the qualification process, paving the way toward Artificial Intelligence-powered, real-time meltpool analytics.
Laser Beam Powder Bed Fusion (PBF-LB) is the most well-established metal Additive Manufacturing process, using 3D model data and a laser (or, increasingly, multiple lasers) to selectively melt and fuse powder layer after layer, enabling the production of complex parts and structures. While metal Additive Manufacturing offers many benefits for innovative industry verticals such as aerospace and medical device production (for example, the use of difficult to work materials, mass reduction and the reduction of material waste), manufacturing defects must still be avoided and the highest quality standards adhered to.
In addition to conventional geometric, dimensional, and surface quality requirements, the characteristics of the metal material itself are under incredible scrutiny. Factors such as density, stiffness, strength, fatigue resistance and, increasingly, conductivity, are subject to unprecedented analysis.

Many of the most critical applications for additively manufactured parts demand stringent quality checks after production. Typically, these inspection processes are time consuming and expensive. To reduce this effort, engineers are constantly seeking ways to detect manufacturing defects on the fly, which means while the production process is still running. To do so, engineering teams need to establish a monitoring process for equipment to ensure stability and productivity throughout the entire operation.
Scan to find scrap
Physically inspecting the entire production output of a metal AM machine is an incredibly inefficient way to work and, indeed, is widely seen as one of the biggest hurdles to the widespread adoption of the technology in production scenarios. In many other production processes, a subset of manufactured parts is inspected in numbers that provide a statistically derived confidence in the stability of the process. However, given the relative newness of metal AM, there is not the same wealth of experience and data against which production engineers can compare output. This is particularly true in cases of brand new products – which many AM parts are.
Renishaw and Altair’s experiment, therefore, set out to see if their existing AM and Artificial Intelligence expertise could be brought to bear in simplifying the quality control process for end-users. As well as being a manufacturer of PBF-LB AM machines, Renishaw is a leader in the fields of process control and automation. In the 1970s, Renishaw gave the world the touch-trigger probe device, found in machine tools and CMMs across the globe to this day. In the intervening years, Renishaw has become a market leader in the fields of machine calibration, positional encoders, and healthcare device production. Altair is a global leader in computational science and artificial intelligence that provides software and cloud solutions in simulation, high-performance computing (HPC), data analytics, and Artificial Intelligence. In an experimental setting, the two companies brought this expertise together to put artificial intelligence to the test with the aim of answering two questions:
- Can Artificial Intelligence find anomalies in a single sample hidden among many, without knowing what or where the anomaly is?
- Is it possible to use inline machine learning routines to find an automated gauging process and reduce the burden of non-destructive testing?
The starting point: It’s all in the data!
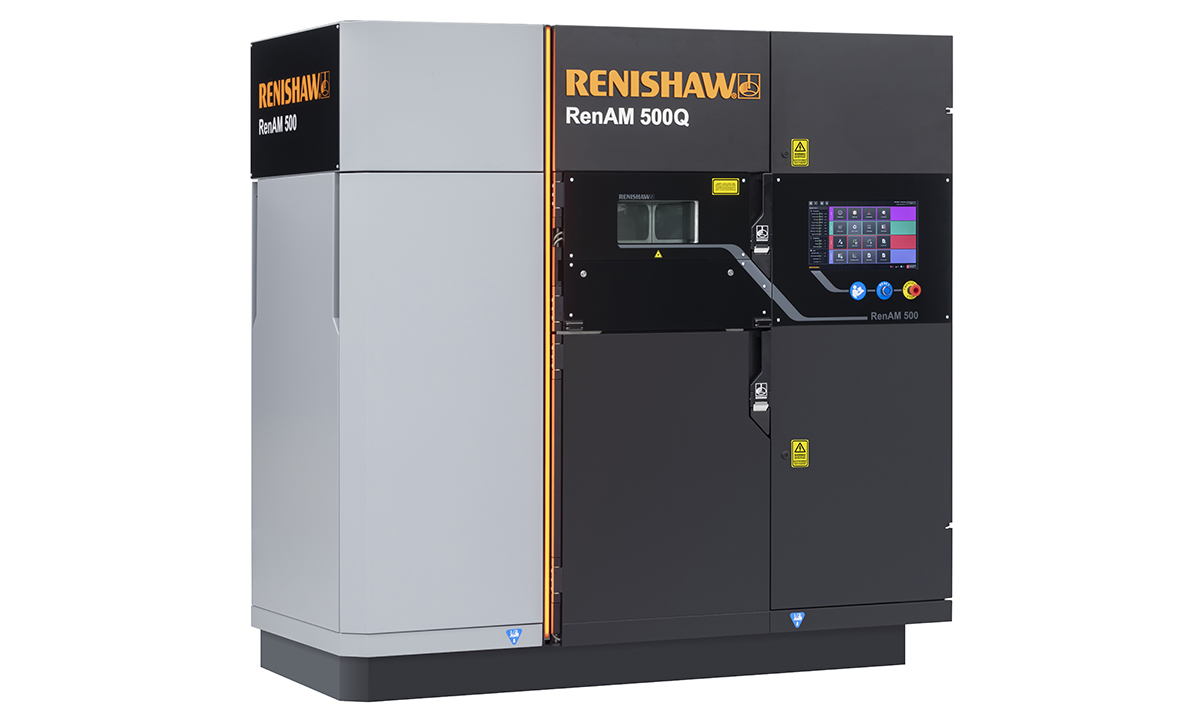
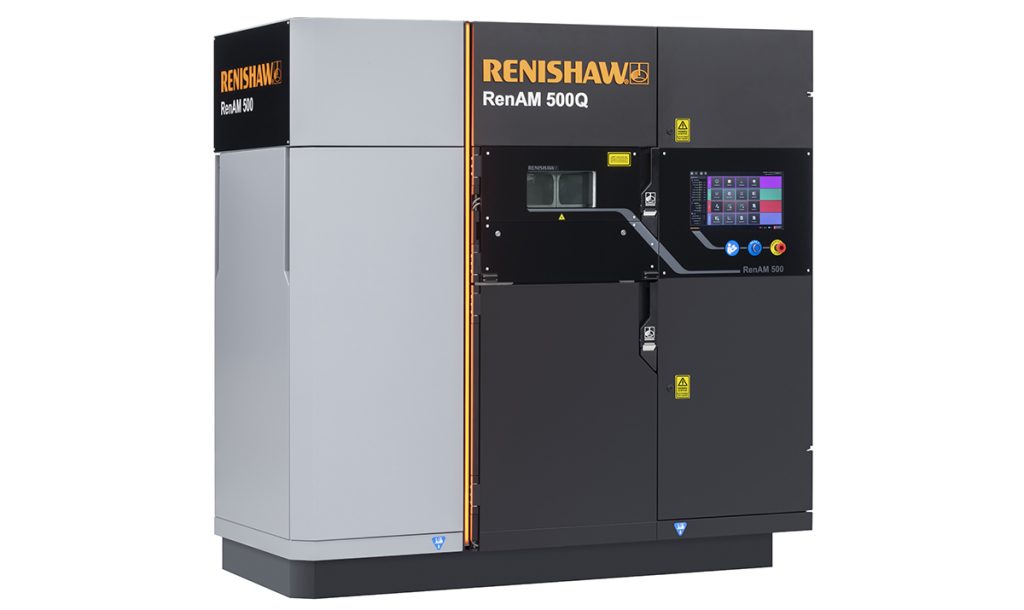
Renishaw’s flagship Additive Manufacturing machine, the RenAM 500Q, has four 500 W lasers and a build volume of 250 x 250 x 350 mm. The machine offers automatic powder and waste handling alongside one of the most innovative, precise and repeatable digital optical platforms on the market, from proof of concept to volume production. Rather than sourcing a third party process monitoring solution, Renishaw developed its own solution for in-situ monitoring of the meltpool at the powder bed. By doing this, it has the capability to ‘lift the curtain’ on the data to a greater extent than is the case in many other similar PBF-LB systems.
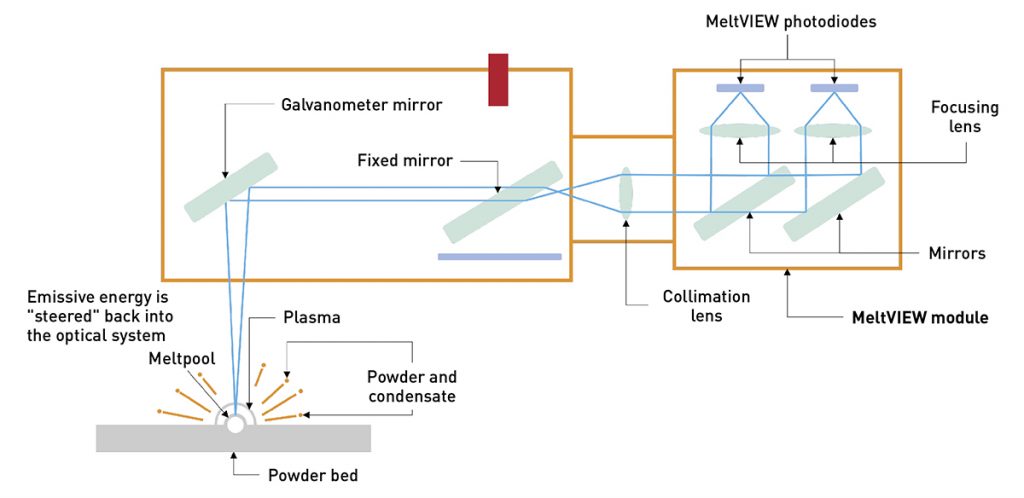
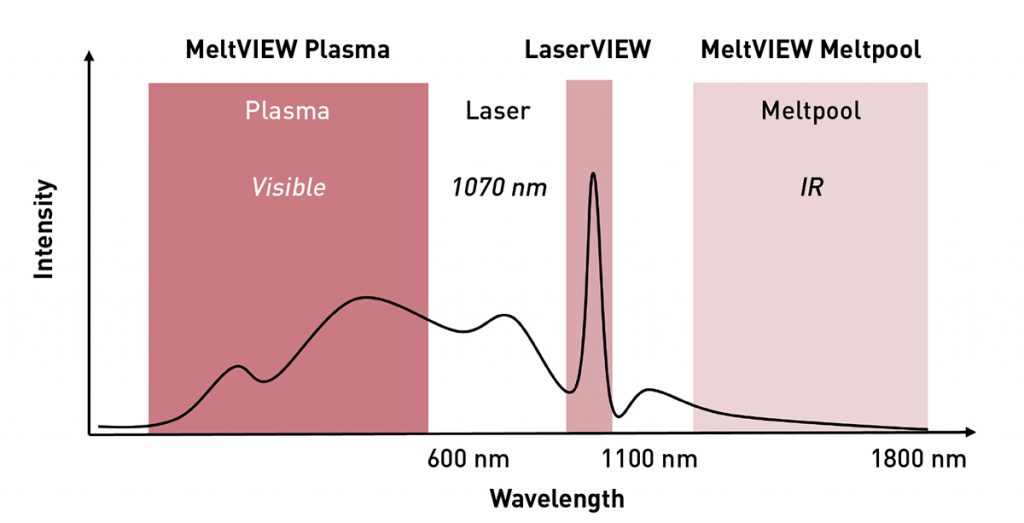
During the build process, light is emitted from the meltpool in various forms. Of particular interest are the wavelengths corresponding to plasma (visible) light and infra-red (invisible) light. In addition, it is beneficial to monitor the wavelength corresponding to the laser itself. By steering these spectral emissions through the optical head and onto a bank of photodiodes, it is possible to sample the intensity of emissions relative to their corresponding 3D position in space. The sample rates in use are extraordinary: typically in the order of 100 kHz, or about 20,000 samples in the time it takes to blink. Such incredible rates of data capture lead to a significant data storage demand.
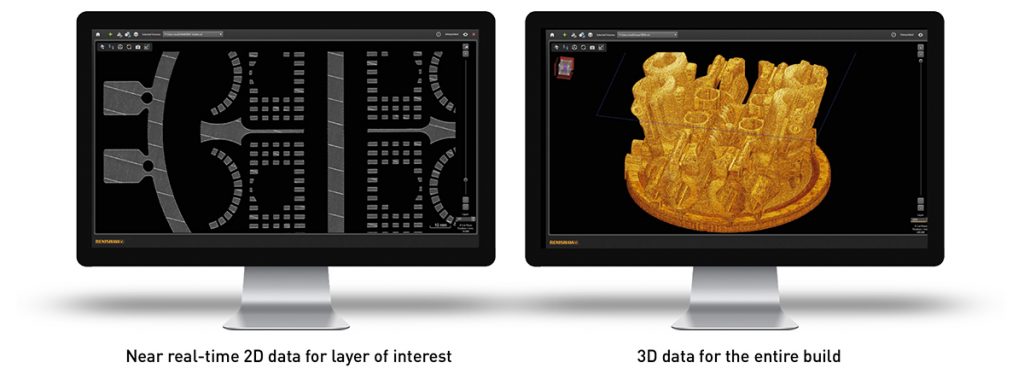
To help in using the data, Renishaw’s software solution, InfiniAM Spectral, filters and renders a graphical representation of the data in a conventional Windows environment. From here, it is an intuitive process for an engineer to browse through the 2D layers of data, or indeed view a 3D representation of the additively manufactured part, coloured according to the intensity of the signals received.
While intuitive to view, there is still a degree of experience required on the part of the engineer viewing the data. There can be so much data available that it is sometimes difficult to interpret in an effective manner. To that end, automating the process – especially in real-time – could be a real boon to the end-user. Given the sheer volume of data involved, machine learning makes logical sense to implement. This is where Altair’s Artificial Intelligence technology comes to the forefront.
Finding the odd one out: Flying blind
As machine learning (ML) algorithms have become more accurate with increased computation power, engineers can now depend on ML technology to make decisions from data without compromising floor efficiency. To leverage this technology, Renishaw asked Altair to dive deep into the data in a special test. Renishaw wanted to use Altair’s Artificial Intelligence technology to flag anomalous builds, and regions within those builds, by analysing spectral data in real time, enabling quality assessent on the fly without the need to wait until production ends.
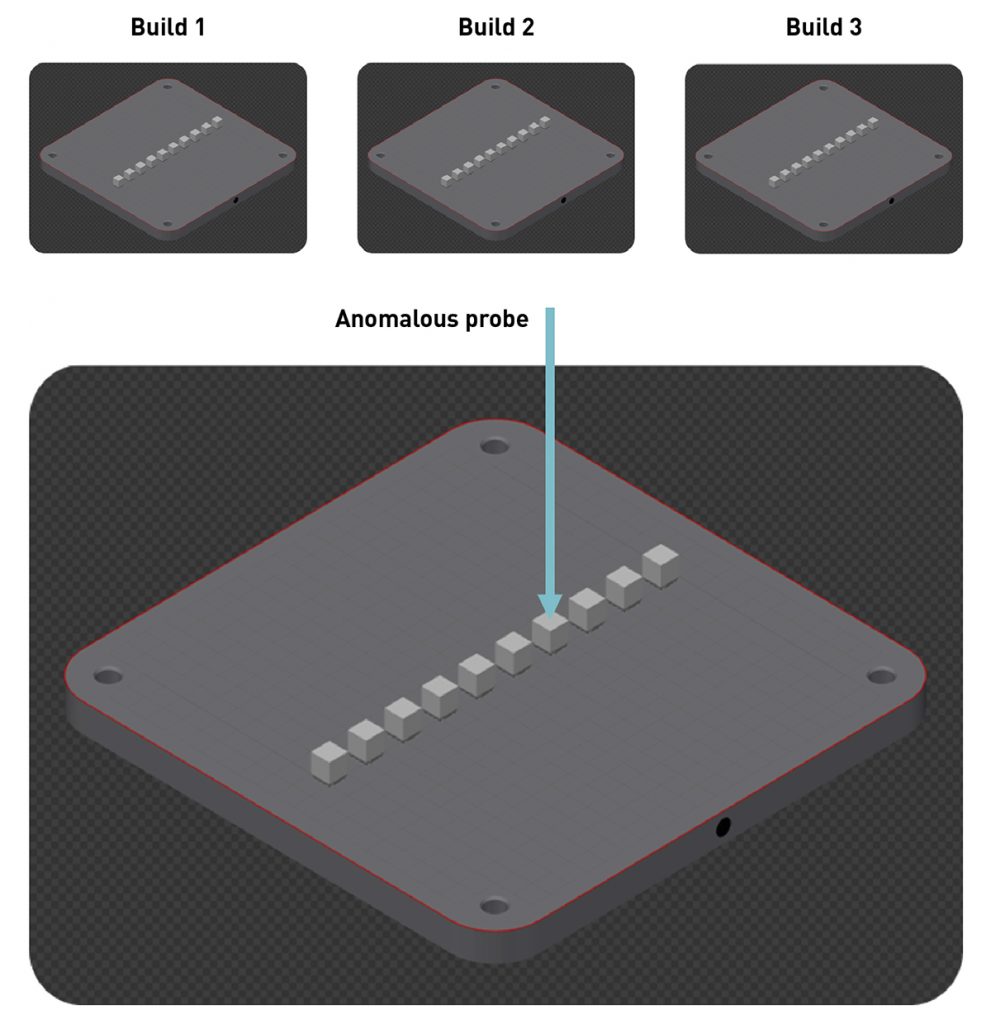
The task for Altair was to set up a data model for the automatic detection of nonconformities and, in effect, create an in-situ decision making toolset. The test consisted of three physical cobalt chromium builds on the Renishaw machine: each build containing ten standard 10 mm density coupons, so thirty coupons in total. In one of these thirty blocks, there would be a deliberately induced non-conformity. Altair was provided no information as to what had been done and where. Moreover, Altair was not provided with any baseline for what ‘good’ even looked like. Altair was more or less ‘flying blind’, only able to see what the quality assurance model was able to identify. The task was split into two levels:
- Build: Detect the non-conforming print
- Region: Detect the 3D region or volume of interest within the non-conforming build.
From data to insight
To turn the data into useful insights, four major steps are required:
- Data acquisition
- Preparation
- Anomaly detection
- Visualisation or real-time monitoring
As the spectral data are captured with a very high sampling rate, the initial step for Altair is data pre-processing. In a function referred to as ‘feature engineering’, five time domain statistical features are extracted per layer. This reduces the noise in the raw data and accelerates the training process of the downstream anomaly detection models. Another positive effect of this pre-processing is a reduction in the sheer size of the raw data.
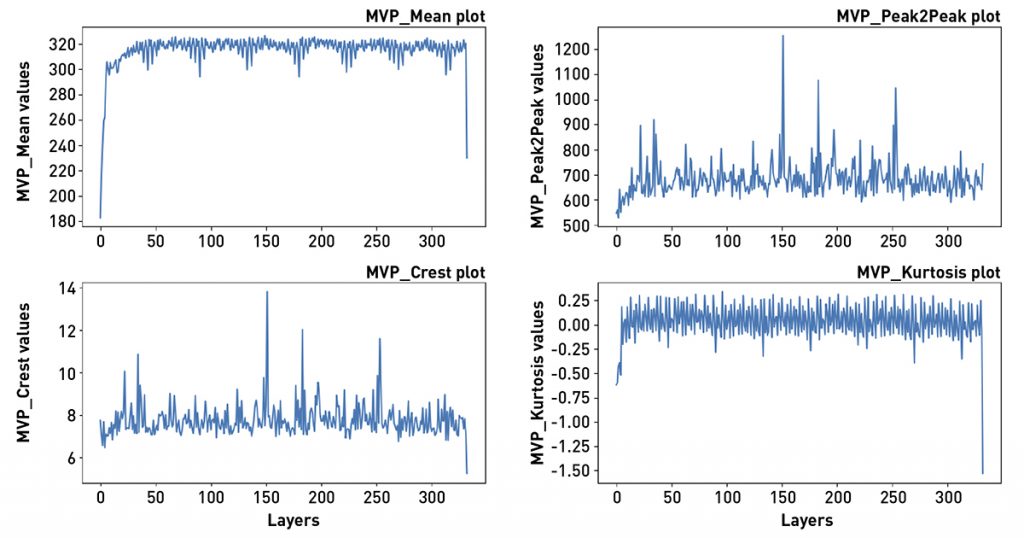
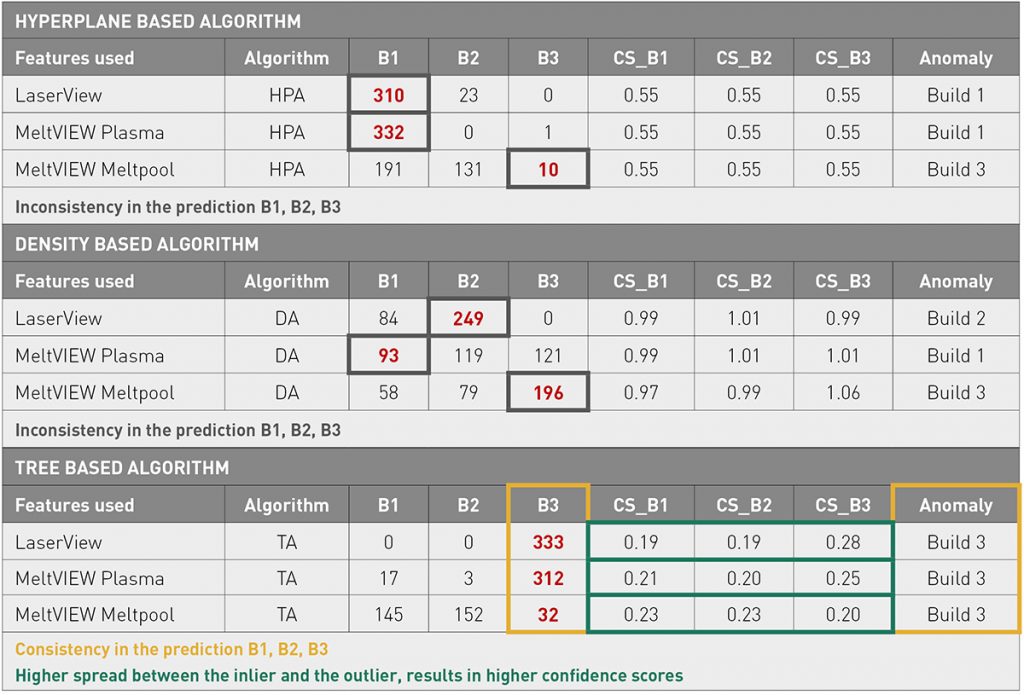
To identify anomalies, Altair uses three different approaches: hyperplane, density, and tree-based algorithms. The extracted features from the data preparation process are fed into SignalAI to identify the algorithm best suited to distinguishing the outliers. After applying various options, a tree-based method proved best for the application. When comparing the algorithms, two factors stand out. Analysing each spectral parameter independently, the tree-based algorithm flagged Build 3 as the anomaly unanimously. So, it is very consistent in its prediction. On top of this, the tree-based algorithm also has higher confidence scores for its predictions. Once the third build was identified, the same process was repeated and an anomaly corresponding to the fourth block of that build was successfully detected.
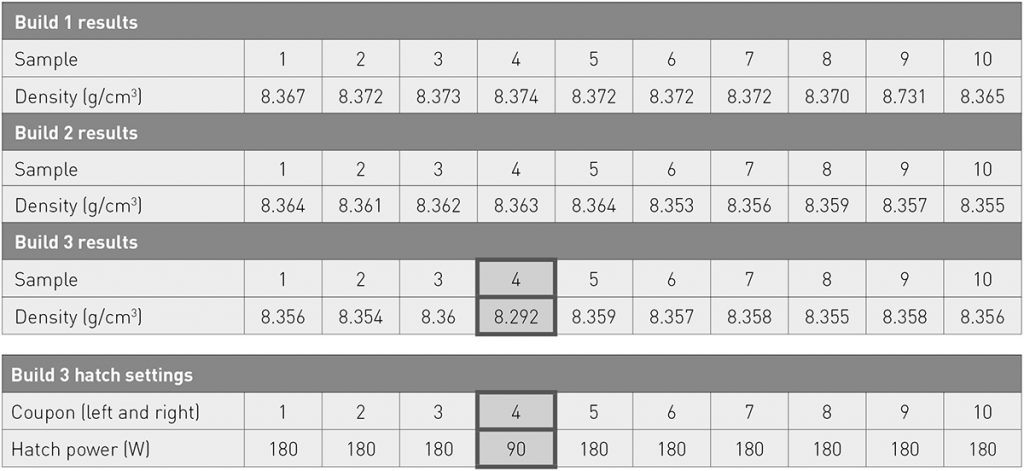
Renishaw confirmed the automated prediction when they revealed that the fourth block in the third build was indeed anomalous. In this case, the laser power used for hatching the block was dramatically reduced from standard processing conditions. The effects were also borne out in the Archimedes density measurements, reflecting one of the many various inspection techniques in use today. Note the very subtle difference in Archimedes measurement for a 50% reduction in laser power.
This data-driven model can detect anomalies and assign them to a corresponding area of a build job. From the implementation perspective within Altair’s product line, data analytics was successfully performed using in Altair Knowledge Studio® as well as in Altair Compose®. Expanding on this, adding Altair® Panopticon™ dashboards can be used to visualise and monitor the final results in real time if continuous remote monitoring is required.
Reducing the burden of non-destructive testing
The Altair tool was used to successfully detect anomalous builds during the metal Additive Manufacturing process. Without any prior knowledge of previous build characteristics, the software was able to successfully determine a non-conforming build and region of interest within that build. The potential of machine learning capability to actively monitor data from manufacturing runs immediately became apparent to the teams at Renishaw and Altair. The opportunity for manufacturing teams to reduce or eradicate physical comparison and detailed inspection of datasets and parts should not be underestimated; the potential time and cost savings could be a leap forward in enabling rapid certification of additively manufactured products.
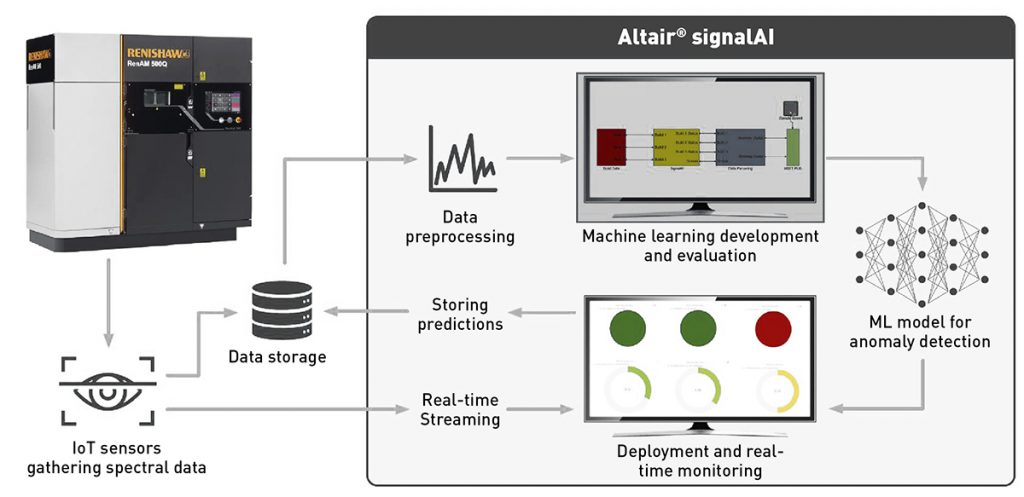
signalAI’s anomaly detection software can be used in real-time locally or remotely in the cloud and includes pre-processing capabilities, allowing complete model builds and analysis to be completed within a single platform.
Making way for the future: metal AM goes Artificial Intelligence
For manufacturers using metal AM technologies, these tests suggest that Artificial Intelligence could enable them to reduce the burden of non-destructive testing by sorting out the candidates where anomalies occurred. Instead of scanning every single part with a CT scanner, the software can tell them which component will not pass the quality check. This method allows a faster and more precise pre-qualification of parts. In the future, this could save up to 90% of inspection efforts, resulting in an enormous increase in efficiency. Another benefit is that this methodology can be added to an existing quality assurance system, hence using existing resources. As quality assurance happens during the production process, this is a closed process, an in-situ quality assurance, paving the way to short-term and long-term advantages.
Implementing data-driven decision making from the ground up allows design and manufacturing teams to holistically analyse processes to improve an organisation’s smart factory practices. Looking forward, an Artificial Intelligence-driven manufacturing approach offers endless possibilities for machine improvement, such as identifying the best sensor type and location for an application, and shared learning to improve processes within an enterprise with a hybrid cloud approach.
Short-term benefits
- Faster and more accurate part qualification
- Reduce the burden of non-destructive testing
- Simplify QA for serial production
- Augment existing QA strategy with minimal disruption
- Reduced data storage as only non-conformance is of interest
Long-term benefits
- Characterise defect formation and identification
- The basis for true closed-loop processing
- Potential to revolutionise production certification for AM
- Speeding up the entire production and qualification process, paving the way for cost efficient mass production
Reducing the number of non-destructive tests – particularly for safety-relevant components in aerospace or healthcare – can help manufacturers worldwide to cut down on quality assurance effort and cost and take another big step towards lean manufacturing. As quality management in metal AM has always been a major bottleneck for mass production, looking for ways to reduce or, perhaps, even eliminate this obstacle might be the biggest advantage manufacturers can now look forward to. This novel method of in-situ quality assurance could pave the way for a whole new manufacturing world.
Authors
Kevin Brigden, Smart Manufacturing Ambassador, Renishaw
Angkit Choudhury, Engineering Data Scientist, Altair
Mirko Bromberger, Director Marketing Strategy, Altair
Altair’s signalAI
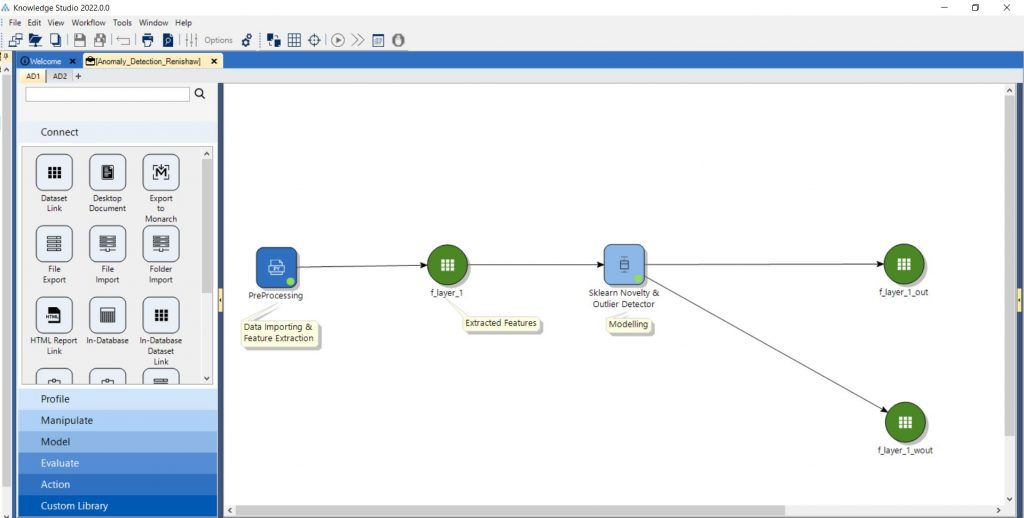
Altair signalAI is a versatile tool which augments the power of signal processing with machine learning to perform sensor signal-based predictive analytics. It is designed to address various types of use cases under the predictive maintenance umbrella with a special focus on anomaly detection, fault classification and root cause analysis. In terms of capabilities, on the data preprocessing front, signalAI offers both time and frequency domain feature analysis and, on the analytics front, currently it supports several state-of-the-art anomaly detection models off the shelf.
Within Altair’s product line, signalAI is available with Altair Knowledge Studio® as well as in Altair Compose®. Following the broader Altair theme of ‘low code/no code’ environment, signalAI is also designed by keeping ease of use for the users as the primary focus and, hence, can be controlled via drag and drop with minimal effort from the user. On top of this, for the purpose of end-to-end deployment, signalAI can be hooked up with Altair SmartWorks IoT if there is a need for real-time data stream monitoring and Altair Panopticon for end-point inference and result visualisation and dashboarding.


