Conify utilises hybrid AM and subtractive methodology for rapid medical supply turnarounds
October 12, 2022

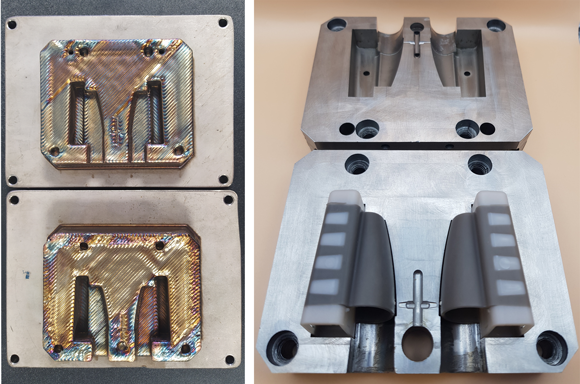
As part of the Injection Moulding Repurposing for Medical Supplies enabled by Additive Manufacturing (imPURE) project, Conify, Laurium, Greece, has employed wire-based Directed Energy Deposition (DED) Additive Manufacturing technology to produce mould inserts for a finger pulse oximeter.
A two-step process combining additive and subtractive manufacturing is deemed necessary for tooling applications when making use of DED in order to obtain near-net-shape metal parts with required tolerances. Utilising a 1.2 kW 6-laser machine from Meltio, Conify required nine hours of Additive Manufacturing time to additively manufacture each oximeter insert. This contrasts with the several-day build time which would be required with Laser Beam Powder Bed Fusion (PBF-LB), though PBF-LB is reported to enable more intricate designs with less post-processing than DED.
Stainless steel 420 wire material cost is another key factor when assessing the cost efficiency of these processes, with powder at least five- to eightfold more expensive compared to the corresponding wire feedstock.
Necessary heat treatments were conducted in order to increase ductility (and machinability) for further post-processing by Pascoe Engineering Ltd, verified by hardness measurements. The insert block was machined to the dimensions required to fit the mother tool The cavities were then rough machined on a CNC milling machine to near finish size, and then – using copper electrodes – the cavities were finished by EDM die sinking. The surface finish was achieved using a finisher electrode on a fine setting, while the cooling channels were also machined the same as the conventional inserts, by drilling in & across the inserts and plugging the cross holes.

Through manufacturing injection moulding trials performed by Pascoe, 1,000 sets of oximeters were successfully produced, reputedly verifying the overall methodology for rapid IM tooling manufacturing through a hybrid Additive Manufacturing/machining approach targeting IM line repurposing under demanding timeframes. 3D Laser scanning as a non-destructive method has been applied to digitally capture the external geometry and any dimensional and/or geometrical deviations of the machined inserts and oximeters produced either conventionally or through Additive Manufacturing and machining, utilising a mesh of seven laser crosses. The acquired data from these scanning procedures were processed in order to extract a digital 3D model that is fully editable in CAD software.
The main objective of the current study was to demonstrate that the two-step hybrid additive and subtractive manufacturing approach is well suited to the imPURE project’s objective: to provide a methodology for rapidly aligning medical supplies to needs in times of emergency.
The 3D scanner used in this study is able to acquire data from multiple angles with high accuracy, despite the object’s complexity. The 3D laser scanner features reputed accuracy of up to 0.030 mm and a volumetric accuracy of 0.02±0.06 mm/m and contains seven laser arrays (cross) and 1 extra line for high details. Then, the data acquisition process followed, as well as various post-processing procedures for the dimensional inspection of the examined part compared to its digitally reconstructed 3D digital model. In order to maximise precision, various parameters were adjusted on the 3D laser scanner regarding the positioning, the number of divisions, the resolution (i.e., points/mm2), the targets and the range of the scanning process.
The parts under investigation were placed on a table with targets, and the objects were scanned at various orientations (i.e., horizontally, vertically, and in front of the scanning field), ensuring that a sufficient number of points were captured for its geometrical reconstruction. Several post-process steps were also conducted which made use of editing tools like trimming, alignment and fusion of the scans in order to optimise and refine the geometrical characteristic of the metal additively manufactured impeller.
Four different views show the dimensional deviation from the CAD file and the error distribution (colour maps) has been adjusted to ±50 µm. Blue represents the negative maximum deviation and the red colour is equivalent to the maximum positive deviation. In contrast, green corresponds to the minimum dimensional deviation between the examined surfaces (below 20 µm). It is evident that the overall dimensional accuracy of the produced oximeters/inserts is very close to the original design. The error shown clearly in the top view of the oximeter is attributed to the elastic nature of the material which can deform.


