Researchers develop efficient method to measure residual stress in AM parts
November 25, 2014
Researchers at Lawrence Livermore National Laboratory (LLNL) in California, USA, have developed what they claim is an efficient method to measure residual stress in metal parts produced by powder-bed fusion Additive Manufacturing.
Residual stress can be a major problem during the fabrication process, state the researchers, as large temperature changes from rapid heating and cooling, and the repetition of this process, can result in localised expansion and contraction causing residual stress.
As well as the potential impact on mechanical performance and structural integrity, residual stress may cause distortions during processing resulting in a loss of net shape, detachment from support structures and, potentially, the failure of Additively Manufactured (AM) parts and components.
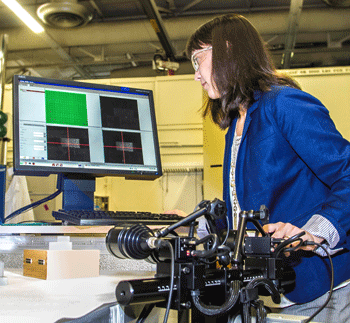
Amanda Wu images an Additively Manufactured part using
digital image correlation (Photo Julie Russell/LLNL)
The research team at LLNL, led by engineer Amanda Wu, has developed a residual stress measurement method that uses digital image correlation (DIC). This process is claimed to be able to provide fast and accurate measurements of surface-level residual stresses in AM parts. DIC is a cost-effective, image analysis method in which a dual camera setup is used to photograph an AM part before it is removed from the build plate for analysis and again after.
In a part with no residual stresses, the two sections should fit together perfectly and no surface distortion will occur. In AM parts, residual stresses can cause the parts to distort close to the cut interface. The deformation is measured by digitally comparing images of the parts or components before and after removal. A black and white speckle pattern is applied to the AM parts so that the images can be fed into a software program that produces digital illustrations of high to low distortion areas on the part’s surface.
In order to validate their results from DIC, the team collaborated with Los Alamos National Laboratory (LANL) to perform residual stress tests using a method known as neutron diffraction (ND). This technique, performed by LANL researcher Donald Brown, measures residual stresses deep within a material by detecting the diffraction of an incident neutron beam. The diffracted beam of neutrons enables the detection of changes in atomic lattice spacing due to stress.
Although it’s highly accurate, ND is rarely used to measure residual stress because there are only three federal research labs in the USA that have the high-energy neutron source required for this analysis, with LANL being one of them. The LLNL team’s DIC results were validated by the ND experiments, showing that DIC is a reliable way to measure residual stress in powder-bed fusion AM parts.
Their findings were the first to provide quantitative data showing internal residual stress distributions in AM parts as a function of laser power and speed. The team demonstrated that reducing the laser scan vector length instead of using a continuous laser scan regulates temperature changes during processing to reduce residual stress.
Furthermore, the results show that rotating the laser scan vector relative to the AM part’s largest dimension also helps reduce residual stress. The team’s results confirm qualitative data from other researchers that reached the same conclusion.
By using DIC, the team was able to produce reliable quantitative data that will enable AM researchers to optimally calibrate process parameters to reduce residual stress during fabrication. Laser settings (power and speed) and scanning parameters (pattern, orientation angle and overlaps) can be adjusted to produce more reliable parts. “We took time to do a systematic study of residual stresses that allowed us to measure things that were not quantified before,” stated Wu. “Being able to calibrate our AM parameters for residual stress minimisation is critical.”
Subscribe to our FREE e-newsletter
Useful links: News | Articles | Introduction to metal Additive Manufacturing


